Monday

White Chocolate Maple cookies

White Chocolate Maple cookies
Hello Sweeties!!! I whipped some home made butter last week, so thought of putting it to some good use. With the holidays coming up, we all need some foolproof cookie recipe up our sleeves. These are one of the most tasty and melt in your mouth cookies!!!! So ready to bake some white goodness!!!

You will need;
1.5 cups-gluten free baking Flour - 
3 tbspn cup Custard Powder -  I used the one I had from the Indian store.
1 stick Butter  

1/2 cup Organic Maple Syrup
1 tsp baking soda
1/2 tsp salt
3/4 cup sugar
1 egg
1 c mix of white chocolate chips.

Preheat your oven to 350F. Line two baking sheets with parchment and set aside. Combine the flour, baking soda and salt in a medium bowl and set aside. 

In a large bowl, beat together the butter and sugar until light and fluffy, about 5 minutes. Scrape down the bowl and beat in the custard powder mix. Scrape the bowl again and add the egg and maple syrup. Add half of the pre-mixed dry ingredients to the batter and mix just to combine. Scrape down the bowl and add the remaining half, mixing until fully incorporated. Stir in the white chocolate chips. 

Using a tablespoon-size scoop, portion the cookies into balls. Place 2 1/2" apart on prepared baking sheets and bake 10-12 minutes, until slightly golden and set. Let cookies cool on sheet for 3 minutes, then transfer to racks to cool fully.

Photobucket

Wednesday

Homemade butter--Almost homemade

Homemade butter--Almost homemade
Hello Dearies!!!! I am in the phase with trying old classics which were a part of my growing up back home. Homemade White Butter pr loni was a everyday thing. Store brought butter was a thing of the new fads, the homemaker was actually looked down in her skills if she brought butter from the store.

Flash forward to new age where everything was OK as who has the time in the world, and I am so busy took over age old traditions and cultures changed.

Making butter and whipping cream gave me some peace as there was more joy than effort in the process. I cranked my stand mixer and made it work for me, enjoying the end results. I emptied a quart of Heavy whipping cream in the mixer bowl and let it whip on high for 7-9 mins, till the butter solids started leaving water. 

At this point I added 5 tbspn Ice water and let the whipper go for anr 2 mins. I emptied the solid in my trusted paneer maker as in the collage, squeezed out the milk(which is like buttermilk and can be used in your cooking/kneading or baking).

And just like that my almost homemade butter was done!!!!!

Photobucket

Saturday

Upasache Bhajani Thalipeeth


Upasache Bhajani Thalipeeth
 Hello Dearies!!! Happy navratri festival to you all. Navratri days are specially fasting days, where you eat only fasting foods for 9 days and break the fast on the 10th day which is Dasserra. 

This year my health is not permitting me any fasts, but I am aiming to complete fasts on important days like the fifth day and the eight and nine day, so I made these bhajani thalipeeth today for the fifth day for my lunch. Although , I don't allow my kids to fast, they are allowed to indulge in the special foods.

You will need;
1 big boiled  and mashed potato 
Approx 1 cup  Upasachi Bhajani/ alternatively use shindaga atta/kuttu aata
2 tbspn roasted peanut powder
1 tbspn Cayenne powder 
1 tspn cumin powder
1 tspn Cumin seeds
1 tsp sugar

Chopped Cilantro
Salt to taste.
Water if needed to knead into  a pliable dough 
Oil for greasing the pan.

In a bowl combine all the ingredients and mix well. Use little water if needed to bind it into a ball. Heat the pan and spray it with a non stick spray or use oil whichever you prefer. Alternatively pat the dough ball on a ziplock bag and then cook on the heated pan. 


Upasache Bhajani Thalipeeth
Press the dough ball into a flat roti and cover with a lid and cook it for about 2-3 minutes. Flip the thalipeeth and repeat the process of covering and cooking.  Enjoy as is or with any sauce/ketchup, yogurt, lime pickle or green chutney.

Photobucket

Friday

Minty Palak Panner Aloo Puri-- School Lunch/Leftover magic

Minty Palak Panner Aloo Puri-- School Lunch/Leftover magic
Hello Sweeties!! What do you do with leftovers??? Do you keep eating them till they are done with or transform them into something the whole family will love. I try and transform things around my menu so as to reuse them keeping the interest factor alive.

Indian food and recipes are  full of such leftover magic mingles, we use leftover rice and bread in number of ways, curries get transformed into poori's or parathas and rice into different types of tadkas or pulav's.

I make aloo parathas and palak paneer roughly once in 10 days. These dishes are my kids favorites and they have no complaints and eat these with no grins or groans. There is no nagging required to eat faster or finish whats on the plate. Happy kids equals Happy moms. 

But these dishes are not so favorite with me and Mr. Ash anymore with our dietary restrictions, I end up with few leftovers. So I combined these two dishes and added some mint to freshen up the taste and made puri's for kids lunch boxes. 

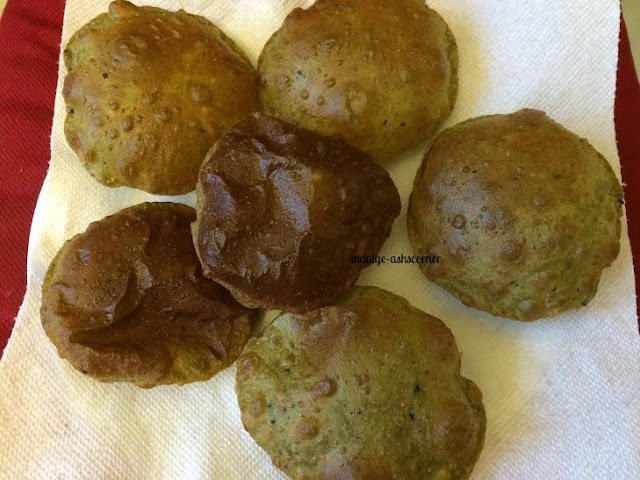
My kids are like chalk and cheese, one likes slightly less fired puri's while other likes slightly burnt and browned puris. so the picture has both in respective choices.


Palak Paneer Recipe.

You will need;
1 to 1.5 cups leftover palak paneer
** Mash and break the paneer cubes as fine as possible
3 cups Wheat Flour 
3/4th cup potato stuffing leftover from Aloo Parathas. 
2 tbspn Dry mint powder
1 tspn red chili powder
1 tspn turmeric powder
1 tspn cumin and coriander powder
1 tsp salt or as per taste
1/2 tspn sugar-optional
2 cups Oil for deep frying--Approx
water to knead the dough
**this dough is slightly hard and not like chapati so use less water to knead the dough, only if needed as the palak paneer will also be wet enough.

In a bowl, take the flour and add the dry powders, salt and sugar, add the palak paneer paste, aloo stuffing, mint powder and knead into a hard dough . Keep aside for 10 mins.

In a wok, take oil for frying, take only as much as the pooris will immerse, I would say about 2 cups of oil, and heat it till it smokes once and then reduce the heat to medium.

Make small round balls of the dough and roll each one out (try rolling like thin cookies). 

If making for school lunches I like rolling and saving the rolled puri's in a ziplock bag in a fridge, so my mornings are better managed. Store these packs in a fridge not the freezer.
Minty Palak Panner Aloo Puri-- School Lunch/Leftover magic

Fry each one of them in the hot oil, one at a time. Do not rush and be extremely careful when frying. The ideal way to fry poori's is to slide the poori from one side of the wok. Do Not throw the poori's in the hot oil, the oil will splutter and splash and burn your hands.

Once you slide in the poori in the hot oil, let it puff up from one side, once it puffs up, turn it and let the other side puff up.. once both sides are puffed , drain them on some paper towels to remove excess oil and enjoyy them hot or cold, either ways they are delish.
 
These make for a quick kids lunch box or picnic food item along the way.

Photobucket

Monday

Eggless Mawa Cake

Eggless Mawa Cake
 Hello Sweeties!!!  I had made mawa/Dry Milk Khoya a few days back, Since then I am hooked on to making Indian sweets and Mithais at home.

I make date cake often using Aayis Recipes Recipe. This time I tried using my homemade mawa and it worked great. Thanks Shilpa for this great recipe. I have added many different fruits and ingredients and made this eggless cake. I keep the liquid and dry ratios constant and change the wet ingredients and it has worked every single time. So Thanks again.

You will need;
1 Cup Mawa/Khoya mixed in  3/4 cup  almond milk
1 Cup Sugar
1/2  Cup Oil
1 Cup Whole Wheat Flour
1 Tspn Cardamom Powder
1 tspn ENO-(Fruit Salt)
 
In a bowl , mix the khoya mixed in almond milk, sugar, cardamom powder and oil, and whisk well till sugar melts.Then add the flour  one big spoon at a time.. keep whisking it till all the flour and the wet mix gets incorporated, and lastly ENO...


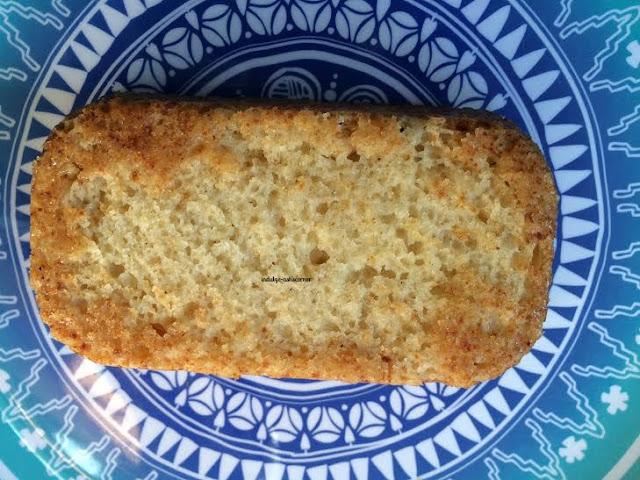
In a well greased pan, pour the mix and bake in a pre-heated oven @ 350.. for about 35-40 mins or till the knife comes out clean.

Eggless Mawa Cake


Photobucket

Wednesday

Date Choc Almond Fudge/Modak

Date Choc Almond Fudge/Modak


Hello Sweeties!! Ganpati bappa has come and gone and I am still not able to get back to my routine. Although I dont bring the bappa home, I do make different kinds of prasad for my kids. 

This year was no different, I tried making this date chocolate modak. I am member of many food groups and I keep admiring the talent people have. Recently, I came across a badam barfi recipe from my friend Shilpa Bhide. She is my main source for this recipe, which I tweaked to suit my kids liking.

You will need;
1 Cup Almond Paste
*Soak 1Cup almond sin water overnight, peel and gring in a blender with some water/milk
1/3 cup Ghee
3/4 cup sugar
8-10 dates paste
1tbspn dark choc powder

Heat a pan on medium heat, melt ghee and add the almond paste dates and sugar and let it cook, stir continuously till it forms a ball. Take off the gas and cool and lastly add dark chocolate powder and knead into a soft dough. Shape modak in moulds. and enjoy.

Photobucket

Homemade Khoya/Mawa from Milk powder--Easy and only 3 ingredients

Homemade Khoya/Mawa from Milk powder--Easy and only 3 ingredients
Hello Dearies!!! I know you have missed me as much as I have missed being away from this space. But when things get too monotonous, I guess its best to take a break and come back refreshed. 

So here I am with a series of homemade sweets. To kick it off I am posting the recipe of the most essential ingredient in most Indian sweets, khoya, mawa or Khava.

This can be made and stored in air tight container in the fridge for 3-4 day, but this recipe measure does not make tons so make it as per the need and  use it up in the sweet.

You will need;
2 tbspn ghee-clarified butter
1/3 rd cup milk
1 cup dry non fat milk powder

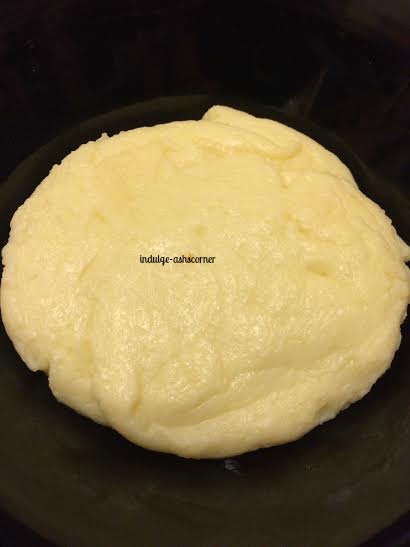
In a pan on low heat; heat ghee and milk, then add the milk powder and let it cook till it starts collecting into a lump. Cook till the mixture turns into a ball. Cool  and mash the mava. Its ready for some pedas or modaks. Can it get any easier than this???


Photobucket

Monday

Minty Cauliflower

Minty Cauliflower
Hello Sweeties!! July is BBQ month. The basic quest for all vegetarian food lovers is what's there for us in the BBQ feast!!!!! There is Indian cottage cheese/paneer, roasted veggies corn on the cobs. So to add one more interesting item to your grand BBQ menu,. my sister has this Minty cauliflowers for you.

They can be made on the grill. in the oven or on the stove top. They will surely make you love your cauliflower and  push the good old greasy French fries to the side. 

You will need;
1 whole cauliflower tore into florets, wash and drain
Enough oil to lightly coat the florets
Sea Salt to taste
Mint paste
** Make a fine mint paste with mint,cilantro, cumin, garlic and green chilies

Coat the florets with some grape-seed oil, sprinkle salt and cook in a wok on high heat. The florets cook fast so it should take about 5-7 mins. stir continuously to avoid burning Alternatively you can also roast in a pre-heated oven at 400Degress, till the florets start browning.

 After the florets get cook reduce heat, add the mint paste till all florets get evenly coated. Minty Cauliflower is ready to be served.

Photobucket

Thursday

Paan Ice-Cream!!! Absolute delight for pan and ice-cream lovers!!!!!

Pan Ice-Cream!!! Absolute delight for pan and ice-cream lovers

 Hello Sweeties!!! summer is here and its really heating up things. Life is busy now with small get-together's Impromptu Park picnics and Ice-cream cravings. After a huge success with mango ice cream, I tried  a paan ice-cream. We love Paan. Paan is a betel leaf preparation widely popular in India and usually chewed after a heavy meal or everyday.

Although its digestive, people get addicted to it adding tobacco and other things, but we like it safe, which is called Meetha Pan. It has no tobacco and betel nut. Meetha/Sweet paan is for kids so has no betel nuts/but has  loads of gulkand/rose petal jam and candy and sweetened coconut and some tutty-fruities.

You will need;
1.5 Cups heavy Whipping Cream
5 teaspoons Conf Sugar
1 tsp corn starch
2 ready made Paans cut into small pieces-- See Notes
5 Pan Bites-Candy in Indian Store--Optional
 
 ** The green paan/leaf in the below picture is store brought, usually you will find Paan makers in most Indian restaurants or vicinities. The right side shows a candy now seen in desi grocery stores called Pan bites
Pan Ice-Cream!!! Absolute delight for pan and ice-cream lovers
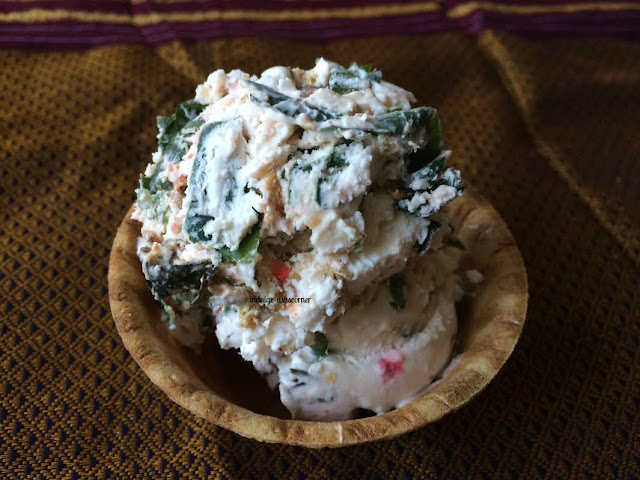
Take the cream, add corn starch and sugar and whip in the stand mixer till soft peaks form. The base is ready. Add the cut paan pieces and pan bite candy and run the whipping blade for another 2 minutes and mix well.
 
Remove the mixture in a frozen ice cream maker bowl. Cover the bowls with some cling film/plastic wrap and set in the freezer for 2-3 hours. 
The soft serve is ready after a couple of hours in freezer. If you want harder ice-cream, freeze overnight or minimum of 6-8 hours. 

Photobucket

Sunday

Egg-less Mango Ice cream

Dear Sweeties!!! June is celebration time. Mangoes are found to be in season, so desserts and sweets with mangoes are  a staple around this time. Mango cream and mango cake is a favorite with Mr. Ash and kids. I overestimated the riping time and brought a overload of mangoes that happened to ripen at the same time. We love mangoes, but it were one too many for us to finish, so I put my ice cream maker bowls to good use and made some low sugar goodness.

You will need;
2 Cups heavy Whipping Cream
3/4th Cup Conf Sugar
1tsp corn starch
2 Mangoes cut into small pieces
 
Take the cream, add corn starch and sugar and whip in the stand mixer till soft peaks form. The base is ready. Add the mango pieces and run the whipping blade for another 2 minutes and mix well.


Remove the mixture in a frozen ice cream maker bowl. Cover the bowls with some cling film/plastic wrap and set in the freezer for 2-3 hours. 

The soft serve is ready after a couple of hours in freezer. If you want harder ice-cream, freeze overnight or minimum of 6-8 hours. Welcome the goodness of ice-cream with no eggs and no preservatives.

Photobucket

Minestrone Soup- Slow Cooker Recipe

Minestrone Soup

Hello Sweeties!!! If you are an soup lover and especially love Olive Garden specialty minestrone soup, hang on, I have this recipe that was passed by a very special friend. But if you know me, you very well know I cannot simply stick to the recipe, I have to deviate and wander off to make it my own, some are big hits some are flops. This is a sure shot big hit, maybe because I did not let go of the basic recipe and simply added my own additions. Or maybe because it was cooked in a slow cooker and used stock to enhance flavors and make it more earthy. It is full of good nutrition and zero oil except if you used re-fried beans like me, you would not call it zero oil. Feel free to replace the re-fried beans with any beans of your choice to make it truly a zero oil soup recipe.

You will need;
2 carrots chopped in semi circles
1 stick celery chopped fine
2 sprigs Green onion
1/2 cup spinach
2-3 big florets of broccoli
2-3 cloves garlic-crushed
1 tbspn Italian Seasoning
1 Qt box of vegetable stock
1 cup Pasta-I used elbows
1 can re-fried beans--(Had to use them)-Use any beans you prefer
1 can diced tomatoes or use fresh
1 tsbpn fresh rosemary
6-8 leaves of fresh basil torn
Salt to taste

In a slow cooker insert, add all the above ingredients and let it to cook for 8 hrs on low or 6 hrs high. Enjoy the soup after the slow cooker has done its job well.


Photobucket

Monday

Panjiri-- Power House for new mothers


Hello Sweeties!!! Don't just abandon me for being missing. I am trying to post to the best of my ability, but since I am not learning any new recipes, posting has been awfully slow.

We are always in a rush that we tend to not have  a proper breakfast and grab a ton of sugar packed cereals or bars on our way out of the door. This recipe is for Panjri, which is commonly made in North Indian homes when someone has had  a major surgery or just had  a baby. Essentially packed with sugar, good fats and nutrition, this can be made where there are picky eaters or people with weak immunity or anyone who needs an extra boost of energy. I eat a couple of spoonful of Panjiri on days I have to skip breakfast.

The powder can be eaten mixed in warm milk to make porridge or kheer or as is.

You Will Need; 
2 Cups Whole Wheat Flour
1 Cup plus 2 Tbspn ghee/clarified butter
1.5 cups Sugar-Confectioner or ground sugar

1/3rd cup sweetened coconut flakes
1 tspn Saffron/kesar
1 tbspn Pista Powder

1 tbspn Almonds- shivered
1/3 rd cup chopped Walnuts
2 Tbspn Edible Gum/Dink/Gond
2 Tbspn Crushed Fenugreek/Methi seeds
2 Tspn Cardamom Crushed or Elaichi powder

In a wok, heat the 2 tbspn ghee, fry the edible gum, till it blooms in the ghee. once fried, remove on a plate and let cool. Then crush the fried gum and keep aside.

 
In the same wok, take the remaining ghee, add the wheat flour and roast  on medium heat. Stir continuously taking care than the flour does not stick to the pan and burn. Stir for about 25-30 mins, till the mixture looks frothy and becomes really loose.

 
When the flour changes color add the crushed methi seeds and keep roasting for 2-3 minutes, stirring continuously. Switch off the flame and let cool. 


When the mix is warm enough to dip your finger and add the elaichi, dink, coconut flakes, chopped walnut, saffron, shivered almond and pista powder.mix well and when completely cool, store in an air tight conatiner. The Panjiri can be stored at room tempatarure for about week.

Photobucket

Atte ka halwa

Atte ka halwa

Hello Sweeties!!! Today I bring to you kankecha sheera or atte ka halwa. I never liked it as a kid whenever I ate it, maybe the texture or the whole healthy eating bug had not caught me then. If I ever ate any halwa it had to be only sooji and nothing else.

That changed after coming here and see many people relish this healthy snack.

You will need;
1  cup of wheat flour,
1 cup sugar
3 cups water 
5 tbspns Ghee-Clarified butter
1 tsp Elaichi or Cardamom Powder
1 tbspn Cashew nuts powdered -Optional
1tbspn Raisins Optional

In a pan/wok, heat the ghee over medium or low flame and then add the wheat flour, roast the mixture stirring continuously, till the flour changes colour and the nutty aroma fills the house. 
 
Simultaneously boil the sugar+water mixture and once boiled, add the mixture  to the roasted flour and continue stirring...the atta/flour mixture will be slightly wet, cover for 5 minutes, taking care that the halwa is not getting burnt, if needed reduce the heat  to low, cover and cook for 5-7 minutes. 
 
Then add the saffron, elaichi and the raisins( I did not add anything). Serve hot.

Photobucket

Tuesday

Methi Thepla

Methi Thepla
Hello Sweeties!!!! Weather is getting warmer and so are the weekends getting busier. Whenever we travel, I like to carry at least one food item from home. Theplas or parathas are easy to make and can be had on their own.

A famous snack for the state of Gujarat in India, it has sort of become a staple in my home too. I learnt it watching some tv shows. But its very easy to make.

You will need;
2 cup Whole Wheat Flour
1 cup Fresh Methi Leaves-Washed and chopped fine
1 small Boiled Potato
Salt to taste
1 tsp Red chili/cayenne powder
1 tspn Haldi/Turmeric
1/2 tsp cumin powder
1/2 tsp coriander powder
1/2 Amchur or dry mango powder
1tsp Sugar
1 tsp Garam masala
3 tbspn yogurt
2 tbspn oil to knead the dough

Water as needed to make the dough soft.

In a wide bowl, take the methi leaves, mashed boiled potato and the dry spices and add salt and sugar, add yogurt and oil and mix well, now start adding the flour and start mixing in the flour.

Add teaspoon by tea spoon water till you have a soft pliable dough. Once  the dough is soft enough, cover  and let rest for 15-20 mins.

After the dough is rested, roll out the theplas like you would make roti's( make small balls  of the dough and roll out thin round tortillas dusting flour if the tortillas stick to the surface). 

Heat a griddle or tawa on medium heat and cook the theplas on one side. Flip the theplas and spray oil and cook the other side. Repeat on side one and cook both sides. Serve hot with some ketchup. or green chutney or any curry of your choice.

They travel well and stay good for 2-3 days.

Photobucket

Sunday

Dusty The Disney Plane cake


Dusty The Disney Plane cake

Hello Sweeties!!!! I made this cake in December for my sweet nephew, who was waiting patiently for his turn to wish his favorite cake. 

The planning started some time before my annual trip to my brothers town, but I was taken for a surprise when he wished for Dusty the Disney Plane cake. I meant he really wanted to place a toy plane on a cake, but it was me who dares big, and lands in soup at times.

I made this cake topper with homemade marshmallow fondant. The plane cracked right before the time I placed it on the cake, but it was kind of too late to make  a new topper, so I shyly placed it on the cake.

Mistakes happen but what was great was that the birthday boy proudly enjoyed the cake with his friends, which me a very happy and proud aunt that day!!!

Photobucket

Saturday

Tomato Butternut Squash Soup

Tomato Butternut Squash soup
Hello Sweeties!!! Today I bring to you a warm and earthy soup, packed with goodness of vitamins and essential fibers. I have been making soups for dinner in winters and snow days as they warm up the bones like no magic drink in cold cold frosty months. Soups in summer have lost all their charm. There is something about cold winters and bowls of warm soups with winter vegetables. 

You will need,
1 cup cubes butternut squash
1 cup diced tomatoes
1/2 onion--diced
1-2 cloves garlic
1 tbspn Italian seasoning
1 tbspn oil
salt to taste
water or stock

In a pressure pan, heat the oil and add garlic and onions, stir till onions are translucent, then add in the butternut squash, add the tomatoes and let it roast till the butternut squash is browned, then add the salt, spices and water and bring a small boil, cover and pressure cook for 2 whistles.

Once cooled, run a stick blender and puree the soup, adjust water to thin it out if needed. Bring it to  a slow simmer  and enjoy the earthy soup with your loved ones. garnish with cream if you like food art.

Photobucket

Monday

Pineapple Malpua with Instant Rabri


Pineapple Malpua with Instant Rabri

Hello Sweeties!!! Indian sweets like malpua and rabri are known to take forever to make. It is not everyone's cups of tea  and only expert chefs take pride in making such desserts. 

I am no expert and no chef at that, but my search for good food and never scared to try attitude makes me attempt such desserts. I am a part of so many food groups, a silent reader at most, that they help me when I crave for such foods.

I don't remember where I had seen the instant rabri recipe, but it is a hit with my kids who dislike the malai or cream or milk solids in their mouth. I have some issue with the texture too, so this is good for people like me.

Traditionally malpua is made from flour, fried in clarified butter soaked in sugar syrup, this process not only is time consuming but also not figure friendly. I tweaked the malpuas to make them suit to my needs and weight. I made pineapple pancakes instead and they tasted similar. Diet food is at times compromised; but again if you name it different there is no comparison with the original. 

Different name different avatar and everyone is happy. Innovation is another name for disguise in Ashland.

To make the Pineapple Malpua's;
You will need;
6 discs of ripe pineapple
1/2 cup glutten free baking flour
2 tbspn sooji
1 tbspn sugar
3 cloves powdered
2 Elaichi/green cardamom powdered
Milk to make batter.
Ghee or clarified butter for shallow frying.

In a bowl, take the flour, sugar, clove and cardamom powder, mix well, add milk to make the batter. Dip the pineapple discs and shallow fry using ghee in a cast iron pan. Once cooked cool and keep aside.

To make the Rabri;
You will need; 
1 cup Ricotta cheese
1/2 cup condensed milk
3/4th cup milk
2 tbspn Milk masala
** Cashews/walnuts/pistas,saffron, green cardamom and nutmeg powder

In a bowl, mix the condensed milk, ricotta cheese and regular milk and stir till it is well incorporated. Add the milk masala and stir well. Refrigerate for 2-3 hours.


To assemble;
In a single serving dish, take 2 tbspn chilled rabri, place the pineapple pancake/malpua on it and pour some more rabri over it. Serve immediately.

My kids liked the hot malpua and chilled rabri combination. This was so easy and done in less than 20 mins of actual preparation time. I am in love with such pleasing desserts.

Photobucket


Sunday

Guitar cake-- Molded two tone choc bubble wrap Guitar topper


Hello Sweeties!!!! Hope you all are enjoying February festivities at your end. By now you all must know that I am constantly searching new ways to make my cakes interesting. I hope to learn something new with each cake I attempt.

I like to learn some new technique some new way of making my cakes whenever I make for some one special. I have a love bond with my cakes and that makes the cakes extra special for me. 

If I don't love the end result, its not fair to expect that the person for whom I make them, will love it. I know in this cake the strings are not clean, straight and look messy, but I made them with gel icing, as I was not sure how the thin strings with fondant would hold up and I was all out of ideas. I searched high and low for black licorice thread, but was not able to find any. So had to do with what I had on hand.
Guitar cake-- Molded two tone choc bubble wrap Guitar topper

I was not going to use any sort of icing, so needed some thing to make the cake topper look like a guitar, so made this topper with a bubble wrap and melted chocolate. To make it appear authentic I mixed some swirls of dark chocolate in melted white chocolate and stirred it gently just to make it look like wooden specks, It did not turn out as it sounded in my head, but none the less, I loved my attempt.


I used the same cutout I made from paper for the chocolate topper and the cake to make it the same size. The orange is all marshmallow fondant leftover from a Disney Dusty planes cake I made for my nephew.  Hope you all enjoy my cake attempts and keep your grace on me.

Photobucket

Sabudana Wada Waffle--Sago Shingada/Waterchestntu Wade/Nuggets Waffles


Hello sweeties!!!! If you have ever tasted Sabudana Wada, a Maharashtrian snack, you will know and agree with me how tempting this deep fried treat can be. But Sabudana or sago or Tapioca is Starch, I am not getting into any debates here how it is made or if it is really vegetarian, but one thing for sure is that it is so so yummy.

 Sabudana Wada is 100% diet buster and stay away from the aroma if you ever ever happen to be closer, as then it is a war to stay away. But if you like me who likes to hog, stare and stalk expert food makers and join all food groups on social networking, your family will be as happy as mine where eating good is considered. The next big thing in low fat eating is Waffle maker and Danish pan.

I am using my waffle maker to make this, but feel free to make it in a danish maker also. I have tried it many time,s but waffle maker wins this battle in my home.

You will need;
2 Cups Soaked Sago--Soak the sago in water for 10 mins and drain all water out and keep covered for good 5-6 hours.
Approx 1 cup Water-chestnut flour-Singada Atta
The proportion will depend on how soggy the sago is, if its less you will require less flour
2 small boiled potato
2 tbspn roasted peanut powder
1 tbspn Cayenne powder 
1 tspn cumin powder
1 tspn Cumin seeds
1 tbspn Chopped Cilantro
1 tsp sugar
1 tbspn Lime Juice
Salt to taste.
Water if needed to knead into  a pliable dough 

In a bowl combine all the ingredients and mix well. Use little water if needed to bind it into a ball. heat the waffle maker and spray it with a non stick spray or use oil whichever you prefer. Close and let it cook. I have a electric waffle maker like a sandwich maker which indicates when the waffle is ready.Enjoy as is or with yougurt/ketchup or traditional coconut chutney.

Photobucket

Wednesday

Mexican Rice Lettuce Wrap--HB We turn Six!!!

Mexican Rice Lettuce Wrap--HB We turn Six!!!
Hello Sweeties!!!! Today is a big day for us. We turn 5 today. Wow.. time just flies. 6 years, I am still going on slowly and not so steadily. I so badly wish that I could post like a recipe a day, but growing kids and growing commitment have slowed down my pace with posting. I am still happy to not have totally abandoned my baby who turns 6 today. It was a snowy day when I started this blog and it has kept me warm and fuzzy with your love and wishes.

This is the time when I want to thank all my well wishers, readers, family and friends who have been the spine behind Indulge. Their time, efforts and constant words of encouragement is what is adding fuel to my passion of blogging.

Keeping up with my resolve to eat clean and healthy, we have been regular at Chipotle. The kids eat well and that makes me a happy mom. They don't fancy sour cream, and avocado so half the things that make the burrito interesting are missing from their plates. So to please them and add the spice to the otherwise bland Chipotle, we spiced it up at home.


Mexican Rice Lettuce Wrap--HB We turn Six!!!
You will need;
Fresh washed Lettuce leaves
1 cup boiled corn
1/4 cup small diced red pepper
1 cup Black beans
1 tbspn Taco seasoning 
Hot Sauce-as per taste
Store Brought Salsa
2 cups Lime Cilantro rice
* Take warm boiled rice, add 1tbsp butter, salt to taste,  2tbspn chopped cilantro and  juice of 1 lime., mix well and lime cilantro rice is ready.

Mix the boiled corn kernels and the peppers and add in the taco seasoning, salt and hot sauce and keep aside. Empty the can of black beans and drain and wash the liquids, add some salt to it and keep it aside. I add some Taco seasoning to the beans as well.

In a bowl take the corn salad, add in the rice, black beans and the hot sauce, mix well. On a lettuce leaf take some of this rice mixture and fold the leaf to form a bowl and munch on. No plates required to set up, wash and dry. This is PFChang meets Chipotle kind of a dish, makes my kids and tummy equally happy.


Photobucket